Showing posts with label bathroom. Show all posts

Thursday, October 23, 2014

Game of Throne: Cottage bathroom reno reveal

*WARNING* This bathroom makeover includes a very large and very unattractive composting toilet. Please try to envision a nice simple plain old white toilet in its place. There’s also minimal styling due to lack of time and resources.

Let’s start with accepting the fact that this isn’t and never will be the prettiest bathroom ever. But given what it is and the budget and time frame we had to work with, I’m really pleased with how the cottage bathroom reno turned out.

I had one day to choose the tiles, paint, countertop, faucets, and sink. You can read about my design in a day here. I had three requirements when I was out shopping till I was dropping:

1. Has to be available now (no special order stuff)
2. Has to be inexpensive (very tight budget)
3. Has to be brown (my dad’s favourite colour)

After a very long day of shopping and lugging around more boxes of tiles than I care to remember, this is what I came up with. Left to right, top to bottom: Accent & subway tiles for the lower walls, PARA JoJo Whitewash for the trim, BM Smoky Green for the upper walls & ceiling, BM Aegean Teal for the vanity, Luna Crest laminate countertop, grey Naturi floor tiles.

collage

I never did take a proper “before” picture of the bathroom before demo started. This is the best I’ve got – it’s a picture of the primed vestibule area. But you can see most of what little of the bathroom there used to be through the doorway. The throne took up most of the room – there was literally just 2’ x 4’ of standing room in the entire bathroom between the door and the toilet. The opening you see above the toilet used to be the top half of the old outside wall. The window you see is on the new outside wall of the 4’ addition to the back of the house.

Before

The room was torn apart, and hubby redid all the plumbing and electrical and we reconfigured the whole space. The area with the subfloor and insulation is the new extension.

bathroom gutted 2

Our site inspectors discussing how the reno is coming along ;-)

storage 1

All drywalled! (Jackson says please excuse his butt).

drywalle

Some “in progress” shots…

Progress collage

As per a design friend’s suggestion, we laid out the subway tiles in a 1/3 offset pattern. I may actually sorta kinda like subway tiles now :-)

subway tiles 2

Vanity colour inspiration:

aubusson blue and dark wax

Vanity made by hubby and painted by me. I painted a bunch of drawer pulls we already had with oil rubbed bronze spray paint.

vanity

I also spray painted an old mirror that I had with oil rubbed bronze paint. I was going to paint the brass on the wall sconces as well, but ran out of time.

sink from door

Inexpensive sink and chrome faucet, pottery by an artist in Cape Breton, NS.

backsplash

Towels & rug add some colour and pattern.

towel 2

towel on vanity

And as much of the room as I can fit into one picture.

after 4

Before and after of each corner of the room. Well, except for the toilet corner – we really don’t need to see that behemoth again!

corner 1

art 4 pm

corner 3 shower 2

corner 4 vanity corner 3

And now that the bathroom is finally finished, the cottage will be closed up for the winter. DOH! But at least we’ll have a fresh new bathroom next summer :-)

jax sig 2

Linking up to Inspire Me Monday

Inspire-Me-Monday-Link-Party

Wednesday, September 10, 2014

Sub-what-way tiles

I may be the only person in existence who hates subway tiles. I think they’re boring and safe, and they literally make me feel like I’m in a subway station (I spent enough time in those during my University years!)

subway tile[3]

But I want to tile the bottom part of the walls in the cottage bathroom, and I have to use small tiles because the walls aren’t perfectly smooth and flat and hubby said there would be problems with using larger tiles. So, 3” x 6” subway tiles it is. But I don’t want to do the typical subway tile pattern.

So I’ve been doing some googling and looking for other layout options. I really like the herringbone layout, but it may be a bit busy for the bathroom.

herringbone inspired by lynne Image via HGTV Canada


herringbone lowesImage via Lowes

 
I LOVE the look of this vertical stacked layout with accent tiles. I reminds me of plaid.

vertical this old houseImage via This Old House 

 
There’s also the horizontally stacked layout, but it’s more modern feel may not be right for the cottage.

Stacked_Subway_Tile Image via Westside Tile and Stone


Vertically stacked too.

 
I think this is what I’m going to go with – a 1/3 offset layout.

1 3 offset Image via Lowes


Although I just saw this layout a few days ago night, and I kind of like it too. It looks like it may be 1/5 offset.

tile layout
Image via The Block Glasshouse

What’s your favourite subway tile layout?

To see some other cool layout ideas for subway tiles, check out 10 creative ways to use subway tile.

jax sig 2

Wednesday, September 3, 2014

Design in a day

The cottage bedroom makeover is on the back burner while we work on the cottage bathroom. I totally forgot to take a before picture – DOH! – but this is a picture of the gutted bathroom with the same 4 foot extension that was added to the bedroom (the part with the subfloor). Notice the dirt and leaves and crap where the old floor used to be ;-)

bathroom gutted 1

There aren’t many places to shop for bathroom materials near the cottage, so we took my dad’s SUV and trailer back to Ottawa for a couple of days and I went on a serious bathroom shopping blitz. I really had no idea what I was looking for – the only thing I knew was that I was on a super-tight budget.

My dad loves brown and kinda sorta suggested that perhaps possibly maybe the bathroom could be brown… so when I saw the Luna Crest laminate countertop, I had my starting point.

luna crest laminate

Over in the tile aisle I found these mosaic tiles that also fit the brown bill:

mosaics

Together with white subway tiles, I was onto something :-)

tiles

Next I found simple and inexpensive grey ceramic tiles for the floor.

naturi lagos gray

My original thought was to paint the vanity white, but there’s already going to be a lot of white in the room with the subway tiles. And then I had an Ah-Ha moment – teal!


 Traditional Kitchen by La Jolla Kitchen & Bath Designers Studio Stratton Inc

I chose Benjamin Moore Aegean Blue for the vanity colour-matched to PARA Paints Cabinet & Furniture Paint. This is seriously nice paint and holds up to wear and tear extremely well.

aegean teal

I had originally thought brown or grey for the walls and ceiling, but I wanted more colour I debated between a few shades of greeny-blue, and finally decided on Benjamin Moore Smoky Green. OK, it looks grey in the picture, but really it isn’t!

smoky green

I also picked up a sink, shower & vanity faucets, grout, tiles spacers, and everything else I could think of that we would need. Then the next day we loaded up the SUV and trailer and hauled it all to the cottage.

And now the reno is in full gear – more coming in my next post!

jax sig 2

Tuesday, June 17, 2014

New bathroom build

So no sooner has one bathroom renovation ended, and we’re on to…. another bathroom renovation! Well, this one isn’t so much a renovation as a build – we’re adding a bathroom in the basement as part of our basement reno. It’s just going to be a small room with the basics – vanity, corner shower, toilet.

This was quite possibly the fastest and easiest decision making process ever. I love the backsplash tiles and countertop that I’m using in another bathroom project, so I decided why not use them in our bathroom too!

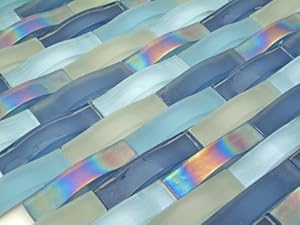
The backsplash tiles are Avenue Mosaic Ripple and will be installed vertically from the top of the vanity right up to the ceiling,

The countertop is this super-cool solid surface by Affinity. The colour is called Celestial Azure – it’s a beautiful turquoise with tiny silver shimmery flecks.

affinity celestial azur

There are sooooooooooooo many funky floor tile options out there, but I decided to go with something subtle(ish) so as not to compete with the backsplash & countertop. Savoia Silk Silver porcelain tiles fit the bill perfectly.

silk_silver1

This is how they look together in the sun on my back patio :-)

basement tiles

We’re going to design and build a floating vanity, similar to this vanity that I helped design for a friend’s bathroom makeover.

floating vanity

We’ll re-use the toilet and the faucet & sink from our pre-reno master bathroom to save money. Plus that means less stuff going to the landfill, which is always a good thing :-)

faucet sink

I haven’t decided on a wall colour yet, but I’m thinking PARA Paints Preque’Ile Point. It’s a soft greeny-grey that goes really well with the backsplash tiles.

presquile point

And there it is, our soon-to-be new bathroom. Hubby has been hard at work jack hammering concrete and moving pipes and framing out walls and basically turning the house into a big dust fest ;-) I’ll post progress pics as soon as there’s progress to show you :-)

jax sig 2