Showing posts with label PARA Paints. Show all posts

Tuesday, June 17, 2014

New bathroom build

So no sooner has one bathroom renovation ended, and we’re on to…. another bathroom renovation! Well, this one isn’t so much a renovation as a build – we’re adding a bathroom in the basement as part of our basement reno. It’s just going to be a small room with the basics – vanity, corner shower, toilet.

This was quite possibly the fastest and easiest decision making process ever. I love the backsplash tiles and countertop that I’m using in another bathroom project, so I decided why not use them in our bathroom too!

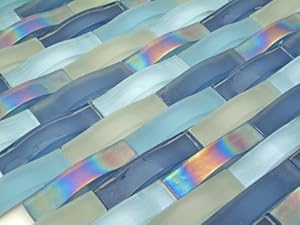
The backsplash tiles are Avenue Mosaic Ripple and will be installed vertically from the top of the vanity right up to the ceiling,

The countertop is this super-cool solid surface by Affinity. The colour is called Celestial Azure – it’s a beautiful turquoise with tiny silver shimmery flecks.

affinity celestial azur

There are sooooooooooooo many funky floor tile options out there, but I decided to go with something subtle(ish) so as not to compete with the backsplash & countertop. Savoia Silk Silver porcelain tiles fit the bill perfectly.

silk_silver1

This is how they look together in the sun on my back patio :-)

basement tiles

We’re going to design and build a floating vanity, similar to this vanity that I helped design for a friend’s bathroom makeover.

floating vanity

We’ll re-use the toilet and the faucet & sink from our pre-reno master bathroom to save money. Plus that means less stuff going to the landfill, which is always a good thing :-)

faucet sink

I haven’t decided on a wall colour yet, but I’m thinking PARA Paints Preque’Ile Point. It’s a soft greeny-grey that goes really well with the backsplash tiles.

presquile point

And there it is, our soon-to-be new bathroom. Hubby has been hard at work jack hammering concrete and moving pipes and framing out walls and basically turning the house into a big dust fest ;-) I’ll post progress pics as soon as there’s progress to show you :-)

jax sig 2

Monday, June 9, 2014

Master bathroom renovation reveal

Wow, was it really two years ago that I excitedly announced that we were FINALLY renovating our master bathroom? Yep, it really was! Looking back at my first blog post about the project, it’s interesting to see what we had envisioned for the room, and how it actually turned out. If you can remember that far back, this bathroom from Sarah 101 was my inspiration:

Things I love about this bathroom…. the tiles, the niche in the wall, the colour scheme, the overall watery look & feel.

So that was the starting point. We literally tore out everything right down to the studs, except the ceiling.

studs 3

Hubby moved & added electrical for the two chandeliers and the vanity sconces and repositioned all the plumbing for the new layout.

drywall vanity wall

shower

Before the reveal, I must send a HUGE thank you once again to Brizo for providing the faucets. They gave me free rein to choose whatever faucets I wanted, and it was an easy choice: the beautiful Virage. The shape reminds me of a curling wave.

brizo faucets

FYI, body jets are a must!

And another huge thank you to PARA Paints. I was on the PARA Paints Blog Crew when we started the makeover, so PARA provided all the paint. I chose P5207-34 Tribeca Square for the ceiling, P5206-24 Peaks & Valleys for the walls, and PF17 JoJo Whitewash for the trim. Thank you PARA!

chandeliers

I couldn't find quite the right grey for the vanity in my PARA deck, so I chose a grey from another company and had it colour-matched to PARA’s ULTRA Cabinet and Furniture paint. Hubby and I designed the vanity, and he built it (which added a few months to the timeline!) The countertop is Super White Quartzite, which turned out to be a much softer stone than we expected. If you’re considering using Super White Quartzite, reading this discussion is a must.

vanity

Blue candles, glass fishing floats, and beautiful pottery made by an artist in Cape Breton are the perfect coastal accents.

accessories

The chandeliers and sconces have crystals that look like water drops.

chandelier reflection 2

The white shower tiles have a wave-like motif, and the small blue glossy mosaic tiles look like glistening water.

shower half wall out

tiles close

I am so in love with the big gorgeous painting that Andrada Anghel created for me. You can read more about it here.

andrada 1

And how did the room turn out? Pretty fantabulous if I do say so myself! Here are the before & after shots of each corner of the room. The icky brass shower is gone…

before 3

…, replaced with a wall-hung toilet tucked into the corner that’s hardly noticeable when you walk into the room.

corner 1 pm 2

Bye-bye bidet…

before 1

…hello custom-made vanity!

corner 2 pm 2

We did update the original vanity about eight years ago – here’s how it looked originally…

before 2

…and now replaced with my dream shower, complete with body jets and NO sill to stub my toes on! :-)

corner 3 pm 2

The new tub is in the same spot as the old tub…

before 4

…but this one doesn’t take up 1/4 of the entire room. And the controls are right on the tub, not on the wall 10 feet away!

corner 4 2

View from the doorway.

bathroom from door 2

I even found a TP holder and a towel bar with crystals that match the chandeliers!hafele_bathroom_ha-980.84.872-s7I’m just waiting for the roman blind to be made and installed, and then we can call this room 100% finished!

In the end, our bathroom really doesn’t look anything at all like the inspiration bathroom. But isn’t that what inspiration is all about – taking something that you love and putting your own spin on it.

vanity from end 2

tub

candles and faucet

So now that the master bathroom reno is done, what’s next on the agenda? Why, another bathroom, of course! Actually, we’re renovating the entire basement, including the addition of a new bathroom. Fun times! ;-)

jax sig 2

Sharing with Inspire Me Monday

Inspire-Me-Monday-Link-Party

If you’d like to read about the entire reno process, here are all the blog posts…

Woot! It’s master bathroom makeover time!
Rub-a-dub-dub, we bought a new tub!

Bathrooms on the brain
When is white not white?
Fit to be tiled
Bathroom tiles: The final verdict
A bump in the bathroom makeover road
My dream has a beautiful Brizo twist!
The final tile verdict
This or That: Shower bench
This or That: Bathroom vanity lighting
This or That x 6: Floor tile layout
This or That: Horizontal vs vertical
This or That: Mirror mirror on the wall
This or That: Vanity backsplash
The bathroom renovation roundup
Bump in the bathroom reno road
The shower tile dilemma solved!
Master bathroom reno progress
Kelly’s Seashore: Commissioned painting by Andrada Anghel

Tuesday, June 18, 2013

Backyard refresh

This spring, I decided that it was time to give our backyard a bit of a refresh. It was looking pretty boring and bland!

backyard before 2

I didn’t want to spend a lot of money (well, hubby didn’t want me to spend a lot of money!) and I couldn’t do much about the plants or torn up grass. With three or four dogs playing in the backyard all the time, flowers will be stepped on and the grassless spots just won’t grow back. So I worked with what I had and fixed up what I could.

My colour inspiration came from this stained glass window that I made years ago at a workshhop given by Out of Ruins.

stained glass 3

I used paint to breathe new life into things that I already had – planters, candlesticks, a lantern, and a small table. I actually loved the colour of the green table, but the finish had become worn and dull after lots of summers outside.

backyard before

I used the same Krylon Gloss Purple spray paint on one of the candlesticks that I used on my $7.00 lamp. I got a lot of use out of that can! The other two candlesticks are painted with Valspar Deep Sea Diving and Tropical Oasis.

Candelsticks

Thanks to my friend Janet for telling me about the glass floats at HomeSense :-) They’re a nice addition to the planters. And I couldn’t resist the cute glass frog :-) I used some shades of turquoise from PARA Paints on the big planters.

Planters

While I was at HomeSense, I saw the turquoise candlesticks and just had to have them :-) And hubby found citronella candles at Home Depot that fit the large candlesticks perfectly. I don’t know if citronella really keeps the mosquitoes away,  but is smells nice :-)

candles

Our old wood Adirondack chairs had definitely seen better days. They were worn and weathered, and the dogs like to chew the arms. I found these plastic Adirondack chairs at Lowes for $16.00 each. They’re the perfect shade of green, and apparently not as tasty as wood ;-)

chairs

And of course, there was the patio table that I showed you back in May that’s been waiting to be finished…

before patio table[8]

I painted the metal on the table Sherwin Williams Oceanside. I used Rustoleum Oil Rubbed Bronze to paint the umbrella base. The tiles on the top are from Lowes. I really want a turquoise umbrella, but we have a brown one that came with the table when we bought it that’s never been used. So frugal wins out – for now! ;-)

table collage

I’d love to dress up the chairs and loungers with cushions and add an outdoor mat, but sometimes practicality has to come first. And I know that a cushion wouldn’t last more then 5 seconds before becoming a chew toy! So the backyard “after” isn’t all that fancy, but it’s colourful and as dog-friendly as I can make it, and an improvement over bland and boring, I think :-)

after 5 pm


Wednesday, May 15, 2013

Lofty celebrations: The Reveal! (A PARA Paints Blog Crew project)

sectional lounge end pm

In yesterday’s blog post, I told you the “Before” story of our loft makeover. And today is the “After” – a day I’ve been looking forward to for almost twelve years! Who says I don’t have any patience? ;-)

So the story left off with Charles the orange sectional and some blue colour chips. And what colour did I decide on? The loft is primarily a home theater, so I wanted to go dark on the walls. I decided on PARA Paints Rainy Skies. The trim is Climb The Mast.

 rainy skies climb the mast

I have to admit, I had an “OH MY GOD, WHAT HAVE I DONE?!” moment when the painter (a friend of ours)started rolling on the first coat. But as the old colour disappeared under Rainy Skies, I loved the transformation more and more. The dark blue went onto the walls and right up onto the vaulted ceiling – which you might think would make the room feel small, but the dark ceiling actually makes it feel like there’s no ceiling at all – it’s like you’re looking up at the night sky.

blue walls 1

Click here to read the railing saga, complete with a fire at the paint shop!

When the painting was done, it was time to have some decorating fun! Which was a bit of a challenge, because I really couldn’t condone going out and buying new stuff when we already have so much stuff in our house. The only things I bought are the cushions and orange throw and a piece of art. And we bought a few pieces of furniture at Ikea to hold the media components. Otherwise, everything in the loft came from somewhere else in the house.

I slightly modified my plan to create a reading nook with a chaise:

blue nook

And opted for a leather arm chair, cow print foot stool, and small side table. I prefer to buy original art, but the colours in this piece were perfect and for $15 at HomeSense, it was too good a deal to pass up :-)

art 2

reading nook 4 pm

I put my telescope in the opposite nook.

telescope 1 pm

This little seating area in the corner has two more leather arm chairs, an orange ceramic drum stool (originally bought for the back patio), and a floor lamp. I couldn’t resist buying the orange bicycle cushion :-) A triptych I bought years ago from my friend & artist Matt LeBlanc will go on the wall above the chairs.

leather chairs

When we bought the sectional for our family room a couple of years ago, we needed to put the sofa somewhere. Of course, it ended up in our loft, the home for wayward furniture :-)

beige sofa left end pm

My $7.00 lamp on a craftsman desk that I bought on sale at Pier 1ages ago and never had a real use for – till now :-)

beige sofa lamp 2

Originally, the colour scheme was going to be navy blue, orange, and purple. But I really liked the bright green on the floral cushion, and decided to add more bright green. This green & black plaid throw that I bought last summer in PEI at MacAusland’s Woolen Mills is the perfect addition :-) And it keeps me warm when I’m watching a movie!

orange sofa cushions 2 pm

A couple of years ago, I convinced hubby to make a metal & wood table like the Brickmaker’s tables at Restoration Hardware that are way out of my price range. My original plan was to use scraps of wood that we already had for the top, but then we found a beautiful piece of live edge spalted maple at KJP Select Hardwoods that I loved. It wasn’t quite wide enough for the metal base that hubby already made, so he added a strip of a dark African hardwood down the middle.

coffee table 2 pm

coffee table wide 2 pm

coffee table close 1 pm

A few years ago, I bought four chairs and a pedestal table from Kijiji. We refinished the table and refinished & reupholstered the chairs, and now they have a new home in the loft as a games table.

game table corner 2

Click here to read about the chair makeover and click here to read about the table makeover

Of course, you can’t have a home theater without a big-screen TV, right? Well, hubby grabbed the motto go big or go home and ran with it – he bought a projector and used Screen Goo to paint a HUGE 12’ wide screen on the wall. To hold all the components, we bought three tables at Ikea – a LACK TV bench and two LACK coffee tables – and lined them up together. The bench in the middle was shorter than the coffee tables, so hubby added pieces of oak to the bench legs to make it the same height.

unit under screen pm

Projector off:

room angle 2a pm

Projector on:

room angle tv on 2 pm

With a dark colour on the walls and ceiling, you really get an experience similar to watching a movie in a theater (especially at night when there’s no sunlight in the room).

from behind sofa 3 pm

She approves ;-) (Sorry the picture is crooked, but it was too funny not to use it :-) )

from behind sofa 1 pm

It took 12 years, but our loft has finally been transformed from a big empty unfinished space into a room that’s perfect for watching  movies and sports and entertaining friends. Who wants to come over on Saturday night for a game of Rock Band? ;-)

kelly sig

Thank you PARA Paints and Bonds Decor for providing the paint :-)

Coincidentally, Rachel at Hue recently wrote this blog post about why it’s best to paint a media room a dark colour. Rachel, I couldn’t agree more! :-)

Linking up to…

Between Naps On the Porch